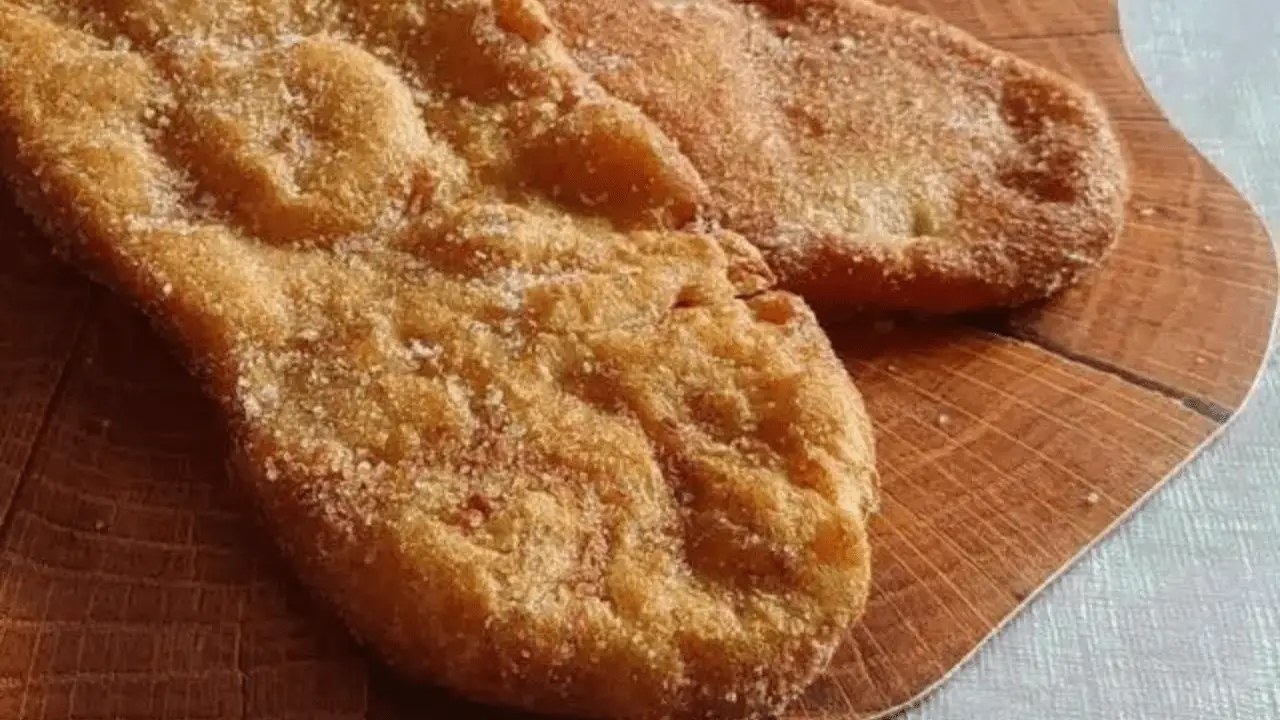
If you’re craving a delightfully sweet and indulgent treat, look no further than the beloved Canadian classic – beavertails. These delectable fried pastries, traditionally coated in a tantalizing blend of cinnamon and sugar, are sure to transport your taste buds to a realm of pure bliss. Imagine the aroma of freshly fried dough wafting through your kitchen, beckoning you to savor every bite of this heavenly creation. Prepare to embark on a culinary adventure that will leave you yearning for more!

Ingredients
To craft these mouthwatering beavertails, you’ll need:
- 4 teaspoons of active dry yeast
- 1/2 cup of warm water (around 110°F or 43°C)
- 1/2 cup of warm milk (around 110°F or 43°C)
- 5 tablespoons of unsalted butter, melted
- 1/2 cup of granulated sugar, plus 1 additional tablespoon
- 2 to 4 cups of all-purpose flour (you may need more or less, depending on the dough’s consistency)
- 1/4 teaspoon of salt
- Vegetable oil for frying (enough to fill a deep pot or pan with 2 inches of oil)
- 1/2 cup of granulated sugar (for coating)
- 2 teaspoons of ground cinnamon (for coating)
Timing
- Preparation Time: 1 hour 30 minutes (including dough rising time)
- Cooking Time: 30 minutes (approximately)
- Total Time: 2 hours
Step-by-Step Guide to Preparing Easy Homemade Beavertails
Step 1- Activate the Yeast: In a small bowl or measuring cup, combine the warm water, 1 tablespoon of sugar, and the active dry yeast. Gently stir and let the mixture sit for about 10 minutes until it becomes frothy and bubbly, indicating that the yeast is active.
Step 2- Prepare the Dough: In a large mixing bowl, combine 2 cups of all-purpose flour, the remaining 1/2 cup of sugar, and the salt. Create a well in the center of the dry ingredients. Pour in the frothy yeast mixture, warm milk, and melted butter. Using a sturdy spoon or your hands, gradually incorporate the dry ingredients into the wet ingredients until a shaggy dough begins to form.
Step 3- Knead and Rise: Turn the dough out onto a lightly floured surface and knead for about 5-7 minutes, adding more flour as needed, until the dough becomes smooth and elastic. Place the dough in a greased bowl, cover with a damp towel or plastic wrap, and let it rise in a warm, draft-free area for about 1 hour, or until it has doubled in size.
Step 4- Shape the Beavertails: Once the dough has risen, punch it down to release any air bubbles. Divide the dough into 12 equal pieces (or 24 for mini beavertails). Roll each piece into a ball, then use a rolling pin to flatten and shape it into an oval or elongated shape resembling a beaver’s tail.
Step 5- Fry the Beavertails: In a deep pot or pan, heat 2 inches of vegetable oil to 350°F (177°C). Working in batches, carefully add the shaped beavertails to the hot oil and fry for 30-45 seconds per side, or until golden brown. Use a slotted spoon or tongs to transfer the fried beavertails to a paper towel-lined plate to drain excess oil.
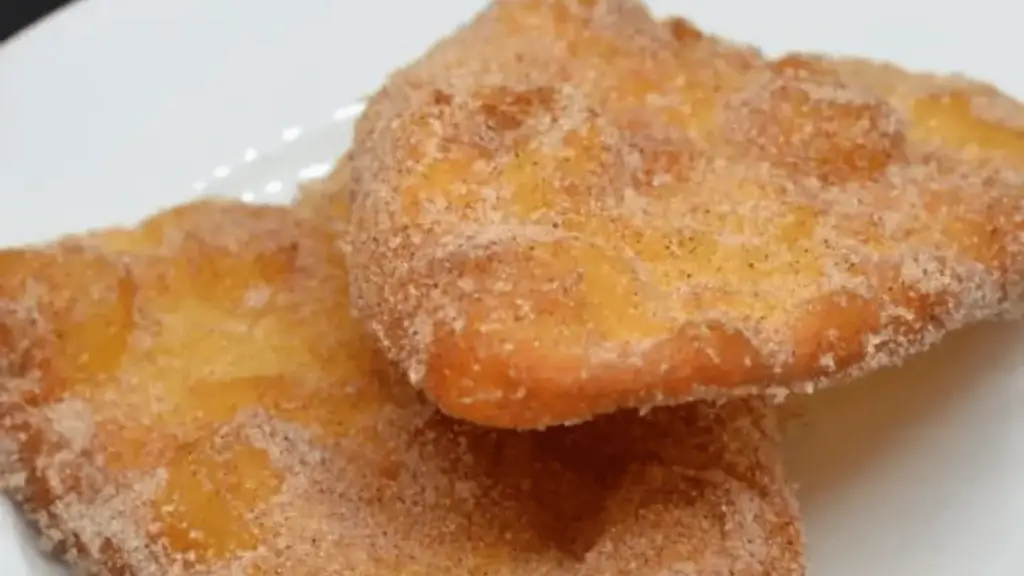
Step 6- Coat with Cinnamon Sugar: In a shallow dish or plate, combine 1/2 cup of granulated sugar and 2 teaspoons of ground cinnamon. While the beavertails are still warm, roll or toss them in the cinnamon sugar mixture, coating them evenly on all sides.
Step 7- Serve and Enjoy: Serve the freshly coated beavertails warm, and savor their crispy exterior and fluffy interior. Prepare to be transported to a realm of pure delight with every bite!
Tips for Achieving the Perfect Beavertail Dough
-
Precise Liquid Temperatures: Ensure that the water and milk used in the dough are warm, around 110°F (43°C). Temperatures that are too hot or too cold can adversely affect the yeast’s performance and the dough’s rising capabilities.
-
Gradual Flour Addition: When kneading the dough, add the flour gradually, a little at a time, until the desired consistency is achieved. Too much flour can result in a dense, tough dough, while too little can lead to a sticky, wet mess.
-
Proper Kneading Technique: Knead the dough vigorously, using the heel of your hand to push the dough away from you and then folding it back over itself. This process develops the gluten strands, resulting in a smooth, elastic dough that will rise beautifully.
-
Warm Environment for Rising: Ensure that the dough rises in a warm, draft-free area, ideally between 75°F and 85°F (24°C and 29°C). This optimal temperature range promotes efficient yeast activity and dough rising.
-
Shaping Consistency: When shaping the beavertails, maintain a consistent thickness throughout each piece. This will ensure even cooking and prevent some areas from becoming overly crispy or underdone.
Delicious Toppings and Variations for Homemade Beavertails
While the classic cinnamon sugar beavertail is a beloved treat, the possibilities for creative toppings and variations are endless. Here are some mouthwatering ideas to inspire your culinary adventures:
-
Chocolate Hazelnut Delight: Spread a generous layer of chocolate-hazelnut spread (such as Nutella) over the warm beavertails, and sprinkle with chopped hazelnuts or chocolate shavings.
-
Fruit Frenzy: Top the beavertails with fresh sliced strawberries, bananas, or a mixed berry compote, and drizzle with a sweet glaze or powdered sugar.
-
Maple Madness: Brush the warm beavertails with melted butter, and drizzle with pure maple syrup for a quintessentially Canadian flavor.
-
Savory Twist: Skip the sweet toppings and opt for a savory version by topping the beavertails with garlic butter, grated Parmesan cheese, and fresh herbs.
-
Peanut Butter Paradise: Spread creamy peanut butter over the warm beavertails, and top with chocolate chips or chopped peanuts for a decadent treat.
-
Lemon Zest Delight: Sprinkle the warm beavertails with a mixture of granulated sugar and fresh lemon zest for a bright, citrusy kick.
How to Fry Beavertails to Golden Perfection
Achieving the perfect golden-brown hue and crispy exterior on your homemade beavertails is an art form. Here are some tips to ensure frying success:
-
Use a Deep, Heavy-Bottomed Pot or Dutch Oven: A deep pot or Dutch oven with a heavy bottom will distribute heat evenly, preventing hot spots and ensuring consistent frying.
-
Maintain the Proper Oil Temperature: Use a deep-fry or candy thermometer to monitor the oil temperature, keeping it between 350°F and 375°F (177°C and 191°C). If the oil is too hot, the beavertails will burn before the insides are cooked through. If the oil is too cool, the beavertails will absorb excess oil and become greasy.
-
Fry in Small Batches: Overcrowding the pot with too many beavertails at once can cause the oil temperature to drop, resulting in uneven cooking and greasy pastries. Fry 2-3 beavertails at a time, depending on the size of your pot.
-
Use a Slotted Spoon or Tongs: When transferring the fried beavertails from the oil to a paper towel-lined plate, use a slotted spoon or tongs to allow excess oil to drain off.
-
Adjust Frying Time as Needed: Keep a close eye on the beavertails as they fry, and adjust the cooking time accordingly. Thicker or larger beavertails may require an additional 30-60 seconds per side to ensure they’re cooked through.
Common Mistakes to Avoid When Making Beavertails at Home
While homemade beavertails are a delightful treat, there are a few common pitfalls to be aware of to ensure success:
-
Overworking the Dough: Excessive kneading or mixing can lead to a tough, dense dough that will result in heavy, chewy beavertails. Knead the dough just until it becomes smooth and elastic, then let it rest.
-
Improper Rising Environment: Yeast thrives in a warm, draft-free environment. If the dough is left to rise in a cool or drafty area, it may not rise properly, resulting in dense, flat beavertails.
-
Incorrect Oil Temperature: Frying the beavertails at the wrong temperature can lead to undesirable results. Too hot, and they’ll burn on the outside before cooking through; too cool, and they’ll absorb excess oil and become greasy.
-
Overcrowding the Frying Pot: Frying too many beavertails at once can cause the oil temperature to drop, resulting in uneven cooking and greasy pastries. Fry in small batches for best results.
-
Neglecting to Drain Excess Oil: Failing to drain excess oil from the fried beavertails can lead to a soggy, greasy texture. Always allow the beavertails to drain on a paper towel-lined plate before coating or serving.
Nutritional Facts
- Calories: 350
- Total Fat: 18g
- Saturated Fat: 6g
- Trans Fat: 0g
- Cholesterol: 30mg
- Sodium: 200mg
- Total Carbohydrates: 45g
- Dietary Fiber: 1g
- Sugars: 15g
- Protein: 4g
Please note that these values may vary depending on the exact ingredients and portion sizes used. Additionally, the nutritional content can increase significantly when adding toppings or variations.
Conclusion
Homemade beavertails are a delightful treat that can transport you to the heart of Canadian culinary tradition. With their crispy exterior, fluffy interior, and irresistible flavors, these pastries are sure to delight your taste buds and bring a touch of nostalgia to your kitchen. Whether you opt for the classic cinnamon sugar version or explore creative toppings and variations, the joy of biting into a warm, freshly fried beavertail is an experience like no other. So, gather your ingredients, roll up your sleeves, and embark on a culinary adventure that will leave you craving for more!
FAQs
Can I make the beavertail dough in advance?
Yes, you can prepare the dough in advance and store it in the refrigerator for up to 24 hours. Let it come to room temperature before shaping and frying.
Can I freeze beavertails?
Yes, you can freeze baked or fried beavertails for later enjoyment. Allow them to cool completely, then store them in an airtight container or freezer bag for up to 3 months. Reheat in the oven or air fryer until heated through before serving.
Can I use a different type of oil for frying?
While vegetable oil is recommended, you can use other neutral-flavored oils with high smoke points, such as canola, peanut, or avocado oil.
How can I make beavertails vegan?
To make vegan beavertails, substitute the milk with plant-based alternatives like almond or oat milk, and use a vegan butter or oil instead of regular butter. Additionally, omit the egg wash in the baked version.
Can I bake beavertails instead of frying them?
Yes, you can bake beav ertails in the oven for a slightly healthier alternative. Preheat your oven to 400°F (205°C), shape the dough into ovals, and bake for 12-15 minutes, or until golden brown. While baked beavertails may not achieve the same level of crispiness as their fried counterparts, they still offer a delightful taste and texture.
How can I ensure my beavertails are cooked through?
To ensure your beavertails are cooked through, use a digital thermometer to check the internal temperature. The center of the pastry should reach at least 200°F (93°C) for optimal doneness.
Can I use a different type of flour?
While all-purpose flour is recommended for the classic beavertail recipe, you can experiment with other flours like whole wheat, bread flour, or a combination of different flours. Keep in mind that the texture and rising properties may vary slightly.
How can I prevent the beavertails from absorbing too much oil?
To prevent excessive oil absorption, ensure that the oil temperature is correct and fry the beavertails in small batches. Additionally, drain the fried beavertails on a paper towel-lined plate to remove any excess oil before coating or serving.
Can I make mini beavertails?
Absolutely! Mini beavertails are a fun and portion-controlled option. Simply divide the dough into smaller pieces and shape them accordingly. Adjust the frying or baking time as needed, as smaller beavertails will cook faster.
How long do homemade beavertails stay fresh?
Freshly made beavertails are best consumed within a day or two. Store them in an airtight container at room temperature for up to 2 days. After that, their texture and flavor may start to deteriorate. For longer storage, consider freezing them as mentioned earlier.